december adventure 2025
Found out about the December adventure on Mastodon (likely from folks over at merveilles.town). It’s already almost a good third of the way into December, but better late than never. Here’s a bit about it, but the idea is just to pick a project or a few, work on them, and log your progress.
Now that December’s over, I’ve written a short retrospective at the bottom of the page.
december 1
Traveling back from Tokyo. I’m not very good at getting things done on the plane.
december 2 - 3
Slightly jet-lagged, had to work late, disliking how much colder it is in New York – it was 70F my last day in Tokyo.
december 4
Took about 1500 photos with the Fujifilm X-S10 over the two and a half week trip to Japan (fewer than I had expected actually, but that’s probably because I didn’t take many photos in Tokyo). As a complete newbie, I’ve been trying to learn a bit about photography and editing. I watched a nice introduction to the FOSS workflow+raw developer software darktable by Kevin Ajili, and processed my first photo.
I haven’t quite straightened out how to post images on my website, but once I do, maybe I’ll show it here. In the interest of keeping page size/load times down (inspired, as usual, by low-tech design), it might make sense to default images to low-detail thumbnails (dithered?), with the full image available via on hyperlink.
Edit, added later: here’s a smallified version of the image I edited.

This was produced with
1magick in.jpg -dither FloydSteinberg -colors 16 -resize 15% out.jpg
The original file was 6280x4160, at around 2.6mb, but I haven’t bothered checking it into the repository. The image above has been scaled down significantly, and with 16 colors comes in at around 82kb.
The tricky thing with ox-hugo (I write my website in org-mode in emacs) is that
I sometimes produce images in the org-file directory instead of the hugo assets
directory (say when writing python code to generate images). These generated
images need to be copied over to the hugo directory. In cases like static
pre-selected images, though, I can just throw them into the hugo directory to
begin with.
december 5
Did a practice JLPT N3 test, what with the exam looming on the 7th. I had been low-key pretty stressed about the exam, given that I hadn’t really studied the language seriously in a few months and had never actually taken any practice tests. Surprisingly, the practice test went well. I’m definitely still lacking on the grammar front, but I now suspect I’ll be able to pass.
With that stress slightly relieved, I ended up editing another 34 photos from the trip. Since I still know next to nothing about editing, I mostly just applied some standard edits (adjusted exposure, tweaked the sigmoid module’s contrast, denoised, dehazed, sharpened) for every image. For a few of them I used the tone equalizer module to bring out some of the shadows or tone down/establish contrast in the highlights. I also played with the colors a bit – I found myself gravitating towards the Kodak Portra 400 like preset on the color equalizer module. I know it’s lazy to use a preset, but the cool-toned greens felt like they captured the mood in some of the small temples. Maybe after doing a bit more photography and editing, I’ll get a better sense of my own creative direction for color.
I hope to post these pictures somewhere. Maybe on my blog or in this digital garden. I’m also considering set up a PixelFed account. It might help me get more serious about learning photography.
december 6
Did another two JLPT practice tests. Feeling pretty hopeful about passing, but not looking forward to the actual experience of taking a filling-in-the-bubbles exam. I don’t thing I’ve taken a written exam in almost 10 years… definitely more used to administering exams at this point.
december 7
Exam went OK. Not super happy with it, but I’d be a bit surprised if I didn’t pass. The passing criteria are not particularly high. I hate the feeling of being totally clueless on an exam question, but I think one has to approach language learning differently than math. Or maybe it’s that language exams tend to have a broader scope (in the sense of the ideas and details that might appear) than math exams tend to. Then again, it feels silly to say that language learning is more of a lifelong process than learning, say, algebraic topology is. So maybe I’ve just got a rosy picture in hindsight of the exams I took in grad school, what with grade performance being largely irrelevant at that point.
kakuji(角字)
I’ve always been really interested in Chinese characters, but this trip I got a hanko made by the very kind Arami-san(荒見さん) at Todo Insho while I was in Tokyo. When sketching out a prototype on paper, he consulted with a little handbook listing out kanji in various scripts. This piqued my interest, and I ended up buying a book on seal script in the design section of a bookstore in Shibuya.
One part of the book that caught my eye was a page-and-a-half section on kakuji (角字, literally: square/angled-letters). There’s something visually striking about their extreme space-filling blockiness when compared to the gentle hieroglyphic curves of seal script or the varied visual rhythm of contemporary regular script.
See, for example, this image I found on Robundo Publishing’s blog:
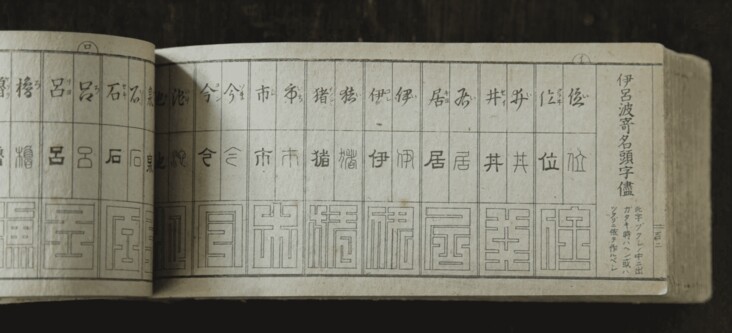
It seems that there aren’t too many examples of kakuji readily available on the web. In particular, there’s no complete font (say, for the jōyō kanji) that I know of. There are about 200 or so examples that I’ve found images of. I’m wondering it would be possible to extend – semi-programmatically, perhaps – the kakuji designs from these examples to all of the jōyō kanji. The basic idea is that Chinese characters can be decomposed into building blocks called radicals, so it may be possible to take the glyphs used for radicals in those examples and extend them. Two immediate caveats: (1) we may not find all the radicals we need in the examples so we may need to make our own designs, and (2) scripts do not generally have unique per-character glyphs, and kakuji are no different.
I’ll get back to thinking about this tomorrow, but for now I’ll link some resources that I’ve found. On kakuji:
- Black Silk, who seem to specialize in family crests/seals and related craftsmanship, have a catalog of 角字
- There’s the Edomoji dictionary (江戸文字大字典) written by 日向数夫, which I can’t figure out how to get a copy of. I learned of this from two videos on YouTube by Inkbox, which are related to what I’m thinking about here. Incidentally, there’s a comment on the first video asking the same question I’m asking here
- An artist Zenzo who designs a few new kakuji every week
On radical-based decomposition of Chinese characters:
- Here is a graphical decomposition of characters that I learned of from the website kanji.club, which may be of use here
- A slightly tangential, but still interesting project called the Recursive Radical Packing Language
december 8
Continuing the thread from yesterday, I thought it might be a good exercise to start by translating the book’s description of kakuji. It’s definitely above my pay grade, but I’ll do my best to translate it in-line (I tend to use the Jitindex Japanese-to-English dictionary).
江戸中期の太平爛熟期になると,寺小屋の普及により, いわゆる「読み,書き, そろばん」 は市民の常識となってきましたし,看板などの文字の書体もいろいろ人目につくように工 夫されてきました。
As the Edo period matured into its peaceful middle years and the terakoya (private elementary schools) spread throughout the shogunate, “yomi, kaki, soroban” (reading, writing, and the abacus) came to be general knowledge among commoners. Accordingly, various calligraphic styles were developed for use on signboards designed to catch the attention of those passing by.
相撲文字や芝居の勘亭流など特殊な書体が創案され, それが今日まで受け継がれてきてい るのは周知の通りです。
Sumomoji (used in advertising sumo) and kanteiryū (used in advertising plays) are two examples of styles conceived during this period that have since then seen continuous use and are still today well-known (to a Japanese audience).
しかし,これらはみな筆文字の変り種ですが,屋号や商標,ことに印半纏の裾によく使わ れた文字は,定規を用いて生み出された当時唯一のレタリングで, しかも楷書からでなく, 篆書を基調としてデザインされていることが特徴といえましょう。
Kakuji is a style of lettering unique to this period of time that – unlike the varieties mentioned above, which used a brush – used rulers to write store names, trademarks, and most of all, to decorate the hems of shirushibanten (livery coats). This style, moreover, did not follow the standard kaisho style of writing used for Chinese characters, but instead was designed off of seal script (the style used to engrave seals).
これはすでに来朝の元・明の禅僧たちによってもたらされた篆刻が, 文人墨客の間に普及 を見て,篆書そのものが一般市民の眼にも親しい存在となってきたからでしょうが, すべ て直線で処理された篆書デザインとして, なかなか優秀なものということができるでしょ う。
Seal engraving, previously brought to Japan by Zen priests, had spread among writers and artists and thus seal script was a familiar sight to the general population, but kakuji would likely have stood out with its purely straight lines.
この直線による筆画の処理は, おそらく中国の九畳篆あたりにヒントを得たのではないか と思われます。
The method of drawing strokes as straight horizontal or vertical lines is thought to have been influenced by the Chinese nine-fold seal script (九叠篆 simplified, 九疊篆 traditional, jiǔdiézhuàn pinyin).
この文字をあしらった印半纏は, 以後明治・大正からつい戦前まで, 大工・左官等の職人 に愛用されてきましたが, 最近はあまり見かけなくなりました。
Shirushibanten adorned with kakuji would remain a favorite of carpenters and plasterers during the Meiji and Taisho eras until the days leading up to the war, but are now rarely seen.
小田切草雲,篆書デザイン,p.38
This passage (which unfortunately seems to be all the book has on kakuji) suggests looking also at the nine-fold seal script. Here are some resources I have found:
- a collection of images of calligraphy manuals including nine-fold seal script
- a site with some images of the Khitan seals and a table of potential correspondences with standard character forms
- some helpful notes on resources for reading Japanese seals
- slightly off-topic, but square Kufic script is an Arabic doppelganger!
I’m sure there are a lot more resources in Chinese, but unfortunately my Mandarin is still super basic.
I was hoping to start looking at some of the available kakuji, breaking down radical shapes, and writing some code, but I got a little too interested in seal scripts and the translation was tough, so I’ll leave that for tomorrow.
december 9
Before I fell asleep last night I was doodling kanji, trying to get a concrete sense of how kakuji are designed. As the passage above points out, kakuji are designed after seal script, so building an intuition of how the contemporary glyphs correspond to seal script glyphs is probably a good place to start. As I do that, though, I think it’d be fun to draw out some kakuji as well!
So… let’s make a kakuji editor! Doodling is all well and good, but it’d be
nice to have a little purpose-built glyph editor. I’ve recently been trying to
learn a bit of C using raylib, and this is as good of a learning project as any.
The basic idea is a simple grid-based editor where you can paint in valid kakuji. I haven’t yet worked out exactly what I mean by valid (we’ll narrow the definition down as we go), but for now notice that kakuji must be space-filling and be composed entirely of vertical and horizontal strokes.
 By space-filling, I
mean that every grid element must have at least some ink in it. The second rule
is actually my own – there are examples on Black Silk’s crest list that have
diagonal strokes (see the image to the left). I’m happy to ignore such cases for
now. This particular example, incidentally, is no longer used: 總 is listed as
the pre-simplified form of 総 in Wikipedia’s list of jōyō kanji, and means whole
or total.
By space-filling, I
mean that every grid element must have at least some ink in it. The second rule
is actually my own – there are examples on Black Silk’s crest list that have
diagonal strokes (see the image to the left). I’m happy to ignore such cases for
now. This particular example, incidentally, is no longer used: 總 is listed as
the pre-simplified form of 総 in Wikipedia’s list of jōyō kanji, and means whole
or total.
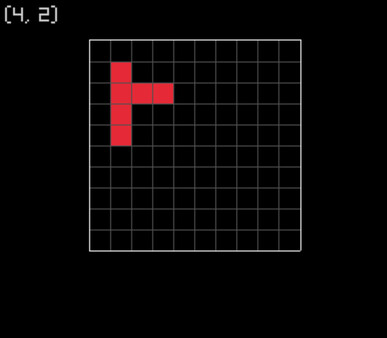
After tinkering for a bit, I got some of the raylib boilerplate out of the way
and ended up with a very preliminary little clickable grid-based editor:
To get a bit of a drawing feel, it’d obviously be nice to click and drag,
brush-like, to draw contiguous blocks of ink. Frustratingly, I seem to be
running into an issue with how raylib interprets my mouse’s position when I
drag. Maybe it’s due to my tiling window manager, or maybe it’s due to some kind
of X/Wayland incompatibility, but as soon as I drag my mouse, raylib reports
that my mouse is a solid 50 pixels above where it actually is, until I release
the left button and move my mouse a bit. It doesn’t seem to be an error in my
code – I was able to reproduce this in the little program I was writing a month
ago to learn the basics of raylib.
Alas, I’ve already wasted most of my night trying to debug this, so I’ll leave it here for now. I suppose I can return to this and swap to keyboard controls, though it definitely won’t feel as smooth. Then finally onto the interesting part: understanding the patterns behind the gaps in ink and the radical shapes!
december 10
Today I let the intrusive thoughts win and started seriously considering writing my own static site generator. It feels like the illogical next step to starting a digital garden. I don’t know if I have the technical chops for it, but I’d like to try writing it in C, potentially avoiding writing any parsing-related aspects for now, just to keep things near my pay grade.
One motivator for me is to stop publishing my site using org-mode and hugo (via
ox-hugo). I definitely have mixed feelings here. As much as I enjoy using and
learning emacs and org-mode (and to be clear, I don’t have any plans to stop
using emacs), I’ve always felt hopelessly out of my depth, and I never end up
setting aside the time to get comfortable enough with site generation toolchain
that I use. This leads to frustration with little things like not being able to
quite control the final html markup that’s generated. Sure – maybe there’s a
way of fixing the little issues that bug me, but I’m easily intimidated by ox-hugo
and hugo. It’d also be nice to remove emacs in the toolchain – I sometimes have
trouble getting the publishing to work on my laptop (and, indeed, I couldn’t get
it to work – I had to finish this update up on my desktop).
I think, generally speaking, I’m coming around to some sort of desire for human-scale computing in my personal life. It’s some kind of diy right-to- but also have-time-to-repair attitude whose emergence in my mind has only been hastened by the current state of big tech and ai slop. It feels much more pleasing to use a small tool for a small job, especially with the fulfillment that comes from having made the neat little tool yourself.
All that being said but what am I looking to get out of a new ssg and therefore a new site design? And what should my small-tech toolchain be and do? Trying to answer this question led me through an associative trail of hypertext digressions, first with reading Vannevar Bush’s essay As We May Think on his speculative concept of the memex (memory-extension), and then reading Ted Nelson’s paper that coined the term hypertext, to learning about the Gopher and Gemini protocols, and then finally learning about various human-scale technology movements like smolweb.
I haven’t yet distilled those ideas into any sort of design outline, though I am inspired by a few concrete examples such as xxiivv (the generator in this case being oscean), low-tech magazine, and pluralistic.net. One thing I will note: I’ve always been interested in experimenting with private annotation on the web (I have occasionally used a browser extension, but not with any serious philosophical thought), though annotations are not very compatible with the “static” in ssg… I was reminded of this interest when I read Nelson’s definition of hypertext:
Let me introduce the word “hypertext”a to mean a body of written or pictorial material interconnected in such a complex way that it could not conveniently be presented or represented on paper. It may contain summaries, or maps of its contents and their interrelations; it may contain annotations, additions and footnotes from scholars who have examined it.
a. The sense of “hyper-” used here connotes extension and generality; cf. “hyperspace.” The criterion for this prefix is the inability of these objects to be comprised sensibly into linear media, like the text string, or even media of somewhat higher complexity…
T H Nelson, A File Structure for The Complex, The Changing and the Indeterminate, p.96 (1965)
In any case, I’ll see if I can’t put something down in writing tomorrow.
Slightly unrelated… but I also ended up reading Grothendieck’s The Responsibility of the Scientist Today (a self-defense mechanism triggered by reading Vannevar Bush?) and skimming a paper showing that nyc’s pm2.5 concentrations may have fallen by as much as 22% after the implementation of congestion pricing. It looks like they analyzed a combination of epa and city sensors. I’d like to get around to understanding this more carefully, so maybe I’ll leave this for another day (it seems the code is on GitHub).
december 11
Working late today, but while I’m taking a bit of a break, here’s some thoughts on basic functionality of a static site generator/site design that I’d like:
- input: I like the idea of writing in markdown, because I think you can throw in html when you need to. important to have utf8 support, which I tend to use for cjk characters. I do also hope to getting back to writing about math at some point – unfortunately I remember mathjax being pretty big and slow. it’d be nice to avoid javascript entirely and see if there are any backend solutions. there’s always the more human route, which is to handwrite via tablet, but that is not very accessibility friendly
- target low page size: aim for fast load times, maybe automatically replace images with low-res variants that can be clicked on to redirect to the full one (I suppose there’s a word for this: thumbnails), stick with default fonts and simple design that can look good on most devices
- basic metadata: creation and modification dates, tags. not sure if index pages are really needed
- backlinks: so fun
- unhierarchical: I’m interested in trying out a mostly flat wiki/memex style approach, letting tags do the organization.
Then there’s some more fun things after the basic functionality is done:
- output: supporting multiple outputs, say gophermap for gopher or gemtext for gemini
- fun little modules: syntax highlighting, a little program that detects and reports linkrot, or a little date-to-co2ppm transformer, or whatever other silly thing I think up of
Before bed I got gforth and uxn installed, and was playing around learning the
basics of forth-style programming. It’s not as scary as it looked, and I hope to
get some time to play with them tomorrow.
december 12
I wrote my first uxntal program today! I was following compudanza’s wonderful
book/online tutorial of which I worked through “day 1” and “day 2”. So far it’s
been the basics of stack-based computation and drawing pixels and sprites to the
screen. I love that drawing to the screen is presented immediately after the
basics – how fun!

I wrote some code to draw the patterns on the keffiyeh I tend to have draped around my chair. I don’t know how to write loops yet, so the code’s a bit silly, but it was fun regardless! Once I learn how to loop and set variables I’ll clean up the code and put it up here.
december 13
Watered the plants (always takes longer than I expect) and leisurely did some laundry.

(I think I took this photo in June, everything’s way bigger now, but the camera’s in the other room and I can’t be bothered)
static site generation
Anyway, I got some time to start thinking about my static site generator more concretely. Working name (because I needed a directory name in my projects folder) is kishin (記伸), coming from “memory” (記憶) and “extend” (伸びる), inspired by the word memex.
Earlier I was considering writing my input files in Markdown, but more and more
I’m starting to think that it’s not much more work to just write plain html (my
current emacs setup seems to have a good amount of snippets already set up in
html-mode). The job of the static site generator will be to:
- do basic templating (separating out the header, footer, etc. from content)
- handle media (organization of images, automatically generating thumbnails, etc.)
- handle timestamps, tags, backlinks, or more generally metadata linking and display
- run any processing modules that I end up writing (math rendering, syntax highlighting, gemtext generation)
In terms of parsing html, I’m not sure how much heavy lifting I’ll actually have
to do. For now I’m thinking I’ll try out the tree-sitter html parser. I’d love
to be dependency-free and write a bespoke parser, but I should probably ease
myself into the intricacies of string parsing and data structures in c. In any
case, I’ve wanted to play with tree-sitter ever since I watched Max Brunsfeld’s
strange loop talk on it.
Actually, now that I think about it for a moment, tree-sitter might be the way to go if I want to do any syntax highlighting for my code blocks…
tree-sitter
As a complete newbie to the c programming world, I couldn’t make heads or tails
of the getting started page in the tree-sitter documentation. After being
confused for a solid half-hour, here’s what I ended up doing, which worked:
- cloned both the tree-sitter and tree-sitter-html sources, built them with
make, and copied the resultinglibtree-sitter.aandlibtree-sitter-html.afiles into mylib/folder. - copied tree-sitter’s
tree-sitter/lib/src/*as well astree-sitter/lib/include/tree_sitter/api.hinto myinclude/tree-sitter/ - made sure my
Makefileknew about these static libraries and the inner include path
I don’t know if this is what I was supposed to do, but I’m able to use
tree-sitter from my main.c, so it’ll do for now. I copied the example code from
the tree-sitter documentation and started playing around with traversing the
tree with TSTreeCursor.
 1#include <string.h>
 2#include <stdio.h>
 3
 4#include "tree-sitter/api.h"
 5
 6const TSLanguage *tree_sitter_html(void);
 7
 8int main() {
 9  // Create a parser.
10  TSParser *parser = ts_parser_new();
11
12  // Set the parser's language (HTML in this case).
13  ts_parser_set_language(parser, tree_sitter_html());
14
15  // Build a syntax tree based on source code stored in a string.
16  const char *source_code = "Hi你好!<p>para</p>";
17  TSTree *tree = ts_parser_parse_string(
18    parser,
19    NULL,
20    source_code,
21    strlen(source_code)
22  );
23
24  // Get the root node of the syntax tree.
25  TSNode root_node = ts_tree_root_node(tree);
26  // Print the syntax tree as an S-expression.
27  char *string = ts_node_string(root_node);
28  // For the example above, "Hi你好!<p>para</p>", it looks like:
29  // > (document (text) (element (start_tag (tag_name)) (text) (end_tag (tag_name))))
30  printf("Syntax tree: %s\n", string);
31
32  // Start traversing the tree with a cursor
33  TSTreeCursor cursor = ts_tree_cursor_new(root_node);
34  bool result = ts_tree_cursor_goto_first_child(&cursor);
35  // If no child was found, abort
36  if(!result)
37      return 1;
38
39  // Print out the node type, and start and end bytes
40  TSNode nextNode = ts_tree_cursor_current_node(&cursor);
41  // For the example above, it looks like:
42  // > text
43  // > 0
44  // > 9
45  // You can check that the Chinese characters here are 3 bytes each
46  // in utf-8 (I suppose somewhere along the lines tree-sitter is figuring
47  // out that we're using utf-8) and so, adding the 3 extra bytes from "Hi!",
48  // we do indeed expect 9 bytes
49  printf("%s\n", ts_node_type(nextNode));
50  printf("%d\n", ts_node_start_byte(nextNode));
51  printf("%d\n", ts_node_end_byte(nextNode));
52
53  // Free all of the heap-allocated memory.
54  free(string);
55  ts_tree_cursor_delete(&cursor);
56  ts_tree_delete(tree);
57  ts_parser_delete(parser);
58  return 0;
59}
In additional to traversal there’s a query API, but I’ll scope that out later. I’ll leave this here for now. Tomorrow I’ll see if I have the time to put together an example static site and get started on the actual site generation.
december 14-18
Bedridden due to the flu. No adventuring was attempted.
december 19
Had a bit of energy by the time evening rolled around, so I decided to learn a
bit more uxntal, with the short-term goal of improving my keffiyeh-drawing
pattern to be less hard-coded. I started pretty basic, just trying to learn a
little bit about defining subroutines and branching. I wrote a bit of code to
print the byte or short that’s at the top of the working stack.
 1@print-short ( a* -- a* )
 2  DUP2 SWP print-byte POP print-byte POP
 3  JMP2r
 4
 5@print-byte ( a -- a )
 6  DUP #f0 AND #04 SFT print-nibble
 7  DUP #0f AND print-nibble
 8  JMP2r
 9
10@print-nibble ( a -- )
11  DUP #0a LTH ?{ !print-hex-digit } !print-digit
12  JMP2r
13
14@print-digit ( a -- )
15  #30 ADD .Console/write DEO
16  JMP2r
17
18@print-hex-digit ( a -- )
19  #57 ADD .Console/write DEO
20  JMP2r
As far as I understand, the .Console/write port only supports printing ascii
characters, so the task was to grab the byte (the case of the short is clearly
reduced to that of the byte in print-short), break it up into the two nibbles,
figure out the corresponding ascii values, and printing those.
Now that I’m looking back at the code, it looks absolutely trivial, but I
learned a lot writing it. I’m starting to get comfortable with the working stack
(still don’t really know much about the return stack) and I now understand the
?{ } construction. In print-nibble we use it to branch based on whether the
nibble is 0-9 or a-f.
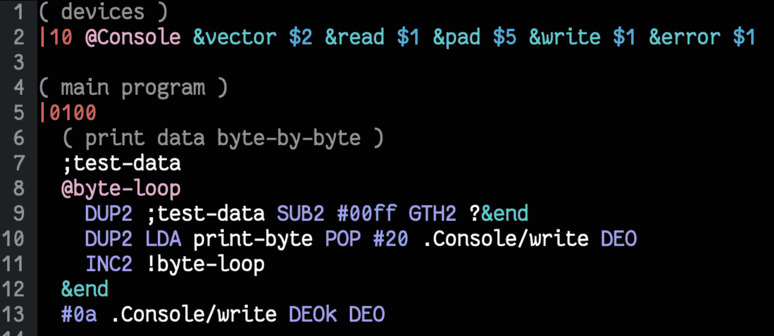
To make sure the code worked, I set up some test data in memory and looped through it, printing the bytes encountered:
1;test-data
2@byte-loop
3  DUP2 ;test-data SUB2 #00ff GTH2 ?&end
4  DUP2 LDA print-byte POP #20 .Console/write DEO
5  INC2 !byte-loop
6&end
7#0a .Console/write DEOk DEO
There’s ff bytes worth of test data, so the first line of the loop jumps breaks
us out of the loop if we’ve passed the last relevant memory address. The next
line does the printing, and the last line moves us to the next memory address
before looping. There’s a similar chunk of code that moves through the data 2
bytes at a time and uses print-short.
I used the sublabel &end twice (once in the byte-printing test and once in the
short-printing test), and was curious how things work under the hood. And
indeed, if you look at the .rom.sym file generated by the assembler (say with
cat or hexdump -C), you’ll find separate symbols byte-loop/end and
short-loop/end, so the sublabels are effectively namespaced by the parent label.
Looking around at the uxntal documentation I later realized that a slick code
snippet to do this is already provided on the software page. It’s quite clever
and I haven’t yet understood how it works. I’ll return to this later (see day
21).
december 20
In the process of learning the
basics of uxntal, I’ve been writing code in emacs with no syntax highlighting or
other conveniences. I thought today might be a good time to try to change that.
Let’s write an emacs major mode for uxntal using tree-sitter!
This is a bit of an experiment in hubris, given that I don’t know much about
emacs, emacs-lisp, uxntal, or tree-sitter. But I’ve found a great article on how
to do this by Mickey Petersen on exactly this topic. In case it’s useful to
anyone else, the code will be here. Here’s what it looks like so far:
I won’t go through all the code in detail,
just some important aspects worth highlighting – definitely read Mickey’s
article if you’re interesting in writing your own tree-sitter major mode. What
follows is more of a log than a walkthrough.
We start by defining a new major mode derived from prog-mode, which is the
generalized “major mode for editing programming language source code”.
1(define-derived-mode uxntal-ts-mode prog-mode "uxntal[ts]"
2  "Tree-sitter major mode for editing uxntal code."
3  (setq-local font-lock-defaults nil)
4  (when (treesit-ready-p 'uxntal)
5    (treesit-parser-create 'uxntal)
6    (uxntal-ts-setup)))
Here we set font-lock-defaults to nil, which I think turns off the default font-locking
system (a somewhat dated regex-based system for syntax highlighting). We’re
going to be using tree-sitter do that. Next, we make sure that we have the
uxntal grammar available, and then create a parser and install it into the
buffer with treesit-parser-create. Finally, we’ll do a bunch of setup in a
separate function.
In particular, we’re going to tell emacs which piece of code to highlight in
what color. As far as I can tell, the colors – or rather, faces – available to
use are listed in the manual here. For example, let’s start by displaying
comments using font-lock-comment-face. To do this, we need to add a new feature
to treesit-font-lock-feature-list, and then define it by telling tree-sitter
which pieces of code to apply which face to.
 1(setq-local treesit-font-lock-feature-list '((comment)))
 2
 3(defvar uxntal-ts-font-lock-rules
 4  '(
 5    :language uxntal
 6    :override t
 7    :feature comment
 8    ((comment) @font-lock-comment-face)))
 9
10(setq-local treesit-font-lock-settings
11            (apply #'treesit-font-lock-rules uxntal-ts-font-lock-rules))
The key point to focus on here is the query ((comment) @font-lock-comment-face).
This is telling tree-sitter that every comment found in the syntax tree should
be decorated with the font-lock-comment-face.
Let’s take a moment to understand how tree-sitter views uxntal code. Using M-x treesit-explore-mode, we can see that the code
1@print-short ( a* -- a* )
2  DUP2 SWP print-byte POP print-byte POP
3  JMP2r
has a syntax tree that looks like:
(subroutine
  (label @ (identifier))
  (comment)
  (opcode DUP2)
  (opcode SWP)
  (identifier)
  (opcode POP)
  (identifier)
  (opcode POP)
  (opcode JMP2r))
Pretty easy to understand. So far we’ve got the comment highlighted. Next let’s
highlight the word/subroutine/label print-short we’re defining. I don’t know if
it’d be fine just to write a query for label, but out of an abundance of
caution let’s highlight occurrences of label that are children of
subroutine. To this, we can use
1:language uxntal
2:override t
3:feature label
4((subroutine (label) @font-lock-function-name-face))
Note that if the query had been ((subroutine (label)) @font-lock-function-name-face) instead, any subroutine with a label child would
be highlighted. Since we don’t want to highlight the code of the whole
subroutine, we make sure that we place our face name right after the element to
be highlighted.
Similarly, we can highlight sublabels with:
1:language uxntal
2:override t
3:feature sublabel
4((rune (rune_char "&") @font-lock-variable-name-face (identifier) @font-lock-variable-name-face))
Note how we single out specifically only runes with &, and make sure to
highlight both the rune’s character and the identifier itself. We do not
highlight the full rune element, though, because that will lead to expressions
like ?&end being fully highlighted. I’d prefer just &end to be highlighted, with
the rune ? left alone.
As one last example, we can highlight square brackets with the comment face since they are purely aesthetic:
1:language uxntal
2:override t
3:feature sqbrackets
4((brackets [ "[" "]" ] @font-lock-comment-face))
Note that in the syntax above we can specify the language every time we’re
describing a new feature – this comes in handy in the case where you’re dealing
with multiple languages in a single buffer. The override t acts sort of as a
cascading behavior – features defined later can override those defined earlier.
This could be useful, for instance, if you wanted to single out comments that
comments that are defined on the same line as a label.
One final note here: currently my feature list looks like:
1  (setq-local treesit-font-lock-feature-list
2              '((comment opcode hex_literal raw_ascii label sublabel relpad abspad sqbrackets)))
We could instead write this as
1  (setq-local treesit-font-lock-feature-list
2              '((comment opcode hex_literal raw_ascii)
3                (label)
4                (sublabel)
5                (relpad)
6                (abspad)
7                (sqbrackets)
8              ))
where we’ve rearranged how many sublists our features are split into. There’s a
variable treesit-font-lock-level that controls how far down this list
tree-sitter will go when actually executing features. I wasted a lot of time
because I had arranged each feature into its own sublist and then was very
confused when all but the first 4 of my features weren’t activating. For now
I’ve thrown everything in a flat list. Later on, when I know a bit more about
uxntal, I’ll think about how to group them more carefully. The documentation
tells us:
Major modes categorize their fontification features into levels, from 1 which is the absolute minimum, to 4 that yields the maximum fontifications.
Level 1 usually contains only comments and definitions. Level 2 usually adds keywords, strings, data types, etc. Level 3 usually represents full-blown fontifications, including assignments, constants, numbers and literals, etc. Level 4 adds everything else that can be fontified: delimiters, operators, brackets, punctuation, all functions, properties, variables, etc.
Another thing I found slightly confusing at first was the syntax tree query
system. The manual was kinda helpful, though I wish there were more concrete
examples. Mostly I wish treesit-explore-mode allowed for running queries
directly. Instead, I had to play around with treesit-query-capture and
treesit-node-on manually, which was a bit painful. Still, the flexibility,
experimentability, and level of documentation in emacs is super impressive. The
fact that I could get syntax highlighting working as a complete beginner is a
testament to emacs strengths (a lot of M-x helpful... commands were run).
With this small success under my belt, I’m a bit more confident about
implementing other features that a uxntal major mode might have, so I hope to
come back to this soon.
december 21
sublabels and the return stack
Let’s return to the uxntal code snippet for printing hex that we were looking at
on day 19:
1@<phex> ( short* -: )
2  SWP /b
3  &b ( byte -: )
4    DUP #04 SFT /c
5  &c ( byte -: )
6    #0f AND DUP #09 GTH #27 MUL ADD [ LIT "0 ] ADD #18 DEO
7    JMP2r
Two key things to understand here:
- instead of branching we can just use a piecewise formula to determine the ascii character of a nibble. Easy enough
- the subroutine/sublabel calls
/band/care crucial here. What happens is that when we jump to/b, we’ve pushed the address of the call location to the return stack, so by the time we print out the first nibble (out of 4 total to be printed), we have on the return stack the address of the calls to/band/c. TheJMP2rcall pops the/cand has us then go print the second nibble. Since the top of the return stack is now/b, theJMP2rafter printing the second nibble takes us back to (just after) the/bcall, and we thus repeat. We end up printing two more nibbles, but this time of the next byte (as the working stack has changed).
Very very clever: thanks to d_m on irc for helping me understand some of this. I
was confused at first because I couldn’t see how the print (#18 DEO) was getting
called 4 times, which would be necessary for printing the nibbles of a short.
What I hadn’t understood is that the jumps to the sublabels here do more than
just move the program counter – they also modify the return stack. In other
words, JMP2r is not a simple return-from-@subroutine, the way I had been
conceptualizing it.
tree-sitter grammar for uxntal
Small note here for myself: the tree-sitter grammar that I’ve been using (found
here) seems to be unfamiliar with the syntax of the anonymous label ?{ }. The
syntax tree for ?{ !print-hex-digit }, for example, yields:
(rune
   rune_start: (rune_char immediate: ?)
   (ERROR {)
   (rune_char immediate: !)
   (identifier))
  (ERROR })
Things are getting busy as the end of December approaches, so I don’t know if I’ll be able to get to it… but it would be great to learn enough about tree-sitter grammars to submit a patch.
december 22-29
Busy playing mahjong (both riichi and filipino) with family, no adventuring.
december 30
Obtained a hand-me-down 35mm film camera! It’s a 1969 Nikon F (apparently a legendary SLR) with a 55mm f/1.2 lens. Here’s a picture of it, taken with my Fujifilm X-S10 (it’s so much less prettier after reducing the file size, alas):

I’m still very new to photography, so using a fully manual camera with no feedback until the films are developed is probably not a great idea. On the other hand, sometimes being thrown into the deep end can be a good way to learn a new hobby quickly. I picked up 2 rolls of Fujifilm 200 and I’ve been taking a few photos – probably horribly underexposed. The viewfinder on the camera had a mercury-battery powered light meter but the batteries are of course long dead (I’ve read that these light meters tend to become inaccurate after so many years anyway), so I’m currently using a light meter app on my phone to estimate what my shutter speeds should be.
I hope the pictures I’ve been taking actually come out okay. The worst would be to for the film to be completely blank or something when I get it developed. I am fairly confident that the camera’s functioning fine, though. The Nikon F is incredibly robust (full metal construction) to the point that there are stories of it deflecting bullets in war zones. Having grown up with digital cameras and rechargeable batteries, it’s amazing that a bit of chemically treated paper together with a purely mechanical contraption of metal and mirrors can take such incredible photos.
If the first roll comes out alright, I’m hoping to use the Nikon F to learn the basics of film photography over the next few months. It’s quite heavy (especially when you’re used to a modern mirrorless with a small prime lens), so I probably won’t be travelling with it. Instead, I might try to just document everyday life. Given how many photos I take while traveling, it’s probably for the better anyway – film is an expensive hobby…
To keep track of my photography learnings (be it digital or film), I’ve started a Pixelfed account. It’s currently a bit bare, but I’ll start working through my old RAWs and posting the ones I’m proud of.
december 31
Let’s take a look at the tree-sitter grammar.js for uxntal, which can be found at
the top-level of the repository here. The structure is fairly straightforward
(see also the documentation). The snippet
1rules: {
2  program: $ => repeat(
3    choice(
4      $.macro,
5      $.include,
6      $.memory_execution,
7      $.subroutine,
8    ),
9  ),
specifies (using repeat and choice) that a program consists of
arbitrary sequences of the four specified nodes. These nodes must in turn be
defined. The memory execution node, for example, consists of an absolute pad
operation followed by an arbitrary sequence of non-toplevel-statements (which
must be defined as well):
1memory_execution: $ => seq(
2  $.absolute_pad_operation,
3  repeat($._non_toplevel_statement),
4),
The absolute pad operation, in turn, is just the symbol “|” followed by a number (which is described by regex as a 1- to 4-digit hexadecimal):
1absolute_pad_operation: $ => seq('|', $.number),
2number: _ => /[\da-f]{1,4}\s/,
In order to test out changes to the grammar we need to ensure that the tree-sitter command-line interface is installed. Then, in the project directory, we can run
1tree-sitter generate
to generate the parser from the modified grammar.js, and
1tree-sitter parse source.tal
to display the syntax tree for a file source.tal.
The tree-sitter-uxntal repository comes with a folder of uxntal code examples,
but I think they’re a bit old. I put together my own folder of examples
consisting of the projects/examples from the uxn repository, together with the
examples shown (via wasm?) on the uxntal homepage. These programs should be safe
to assume as “valid” (I understand that there’s no such thing as an invalid
uxntal program, but there seems to be a fairly conventional coding style that
tree-sitter should be able to understand). I then ran
1tree-sitter parse examples/**/*.tal
to parse all the source files I’d collected. You can also add the -q flag if
you’re only interested in parse errors.
I got a whole bunch of errors, mostly to do with the usage of angle brackets in
label names, but also the syntax of anonymous labels { }. If we take a look at
the definition of label in our grammar, we’ll see that it refers to identifier,
which is in turn defined by
1identifier: _ => token(prec(-1, /[0-9]?[a-zA-Z_:*/][/]*[a-zA-Z0-9_:#*\-]*/)),
which you’ll notice does not permit angle brackets. I’m no regex expert but I
think we can fix this by throwing in <> both before and after a sublabel / as
1identifier: _ => token(prec(-1, /[0-9]?[a-zA-Z_:<>*/][/]*[a-zA-Z0-9_:#<>*\-]*/)),
For the anonymous labels we can introduce some new syntax
1anonymous_label: $ => seq(
2  '{',
3  repeat($._non_toplevel_statement),
4  '}',
5),
and then add in the anonymous label into the list of non-toplevel-statements.
These two are not the only errors (and my solutions are probably not even 100% correct), but this is roughly how I’m approaching modifying the grammar. I’ve been playing with this in between end-of-year holiday busyness, so I hope to get some time soon to sit down and attack this more seriously.
retrospective
I’m really glad I did the december adventure this year. It gave me a healthy bit of motivation to work on or learn about things that I’m interested in but often don’t have the energy to get around to. One of the big takeaways is that I’m easily nerd-sniped by all sorts of different cool things, which leads me to starting a lot of projects. Here’s a list of things I got interested enough in to start (or at least write about) this month:
- photography and editing photos
- the kakuji script from the japanese edo period
- basic graphics programming with raylib in c
- writing my own static site generator to move away from the complexity of hugo and org-mode
- learning the very basics of my first assembly/stack language uxntal
- learning about the tree-sitter parser generator library and its grammars
- an emacs tree-sitter major mode for uxntal
It’s tough to focus on a single idea and actually complete a project with a work-fried brain split among chores and errands.
With these observations in mind… in 2026 I’d like to:
- continue adding to this digital garden/memex. It’s a bit of a different format from the december adventure, but I’d like to continue recording small bits of things I find interesting, daily if possible
- start more creative projects! Do more photography, learn the basics of sketching/drawing, write a tiny game, …
- try to focus on finishing projects. Not necessarily right away (breaks are good), but eventually. Even if the project scopes are tiny!
Down here I’m collecting the little project ideas that tend to pop into my head:
write up some notes on the basics of how C programs are compiled and linked, what static/dynamic objects and linking are, command line tools to investigate symbols, platform-dependent aspects, etc.
inspired by: me realizing I have no idea what I’m doing when I’m putting together a Makefile or working on a C project on my mac when traveling
speaking of uxn… the
screen.talexample that ships withuxngenerates patterns that remind me of the keffiyeh. time for a little spritework?inspired by: https://www.youtube.com/watch?v=jLRE_TSpnYc
take a look at recent work on the impact of ny congestion pricing on air quality.
inspired by: the air leaking through my windows freezing my toes feeling less pm2.5y than usual
learn a little bit of lean and formalize something fun! Or at least write a new math blog post
inspired by: me remembering (idk why) Kuo-Tsai Chen’s work on integrated integrals, and the connections to Hochschild homology.